How to Make the Switch from Excel Spreadsheets to Asset Panda

Take Control of Your Assets
A personalized demo is just one click away.
When it comes to accurate asset tracking, spreadsheets are never the answer. While it may seem simple to create a new Excel file and add or update asset information, the margin for duplicate spreadsheets, out-of-date records, or erroneous data entry is high. In fact, nearly 90% of spreadsheets are estimated to contain errors according to finance data experts. These errors occur most commonly in frequently updated spreadsheets, like ones that are used for asset tracking.
While switching from Excel to Asset Panda is no small decision, we've gone to great lengths to make the transition frictionless. In this article, we’ll walk through exactly how you can make the switch from Excel to Asset Panda and set your organization up for asset tracking success.
Migrate Your Data from Excel to Asset Panda in 3 Easy Steps
We know it’s no small decision to switch from Excel to Asset Panda, but the transition between systems is much less difficult and time-consuming than you may think. Let’s walk through the 3 steps you’ll take to successfully migrate your data from Excel to Asset Panda.
1. Take stock of your current asset inventory
As we said earlier, spreadsheets leave a lot of room for incorrect or duplicate information. No matter the size of your organization, it’s essential to begin this transition period by auditing your asset inventory and recording the information in one cohesive spreadsheet. (We promise that the implementation process is the only time we’ll recommend using an Excel spreadsheet.) Before you begin to import your asset information, let’s talk about grouping and naming conventions.
2. Solidify your collections and fields
Once you've taken inventory of all your assets, consider how you’ll split them into different groups or, as we call them in Asset Panda, collections. This is essential because you’ll import all of your assets by collection (e.g., IT assets, furniture, etc.) Be sure to create unique spreadsheets for each collection from your complete inventory list, then build out all your collections in Asset Panda by hitting the Create button on the bottom left side.
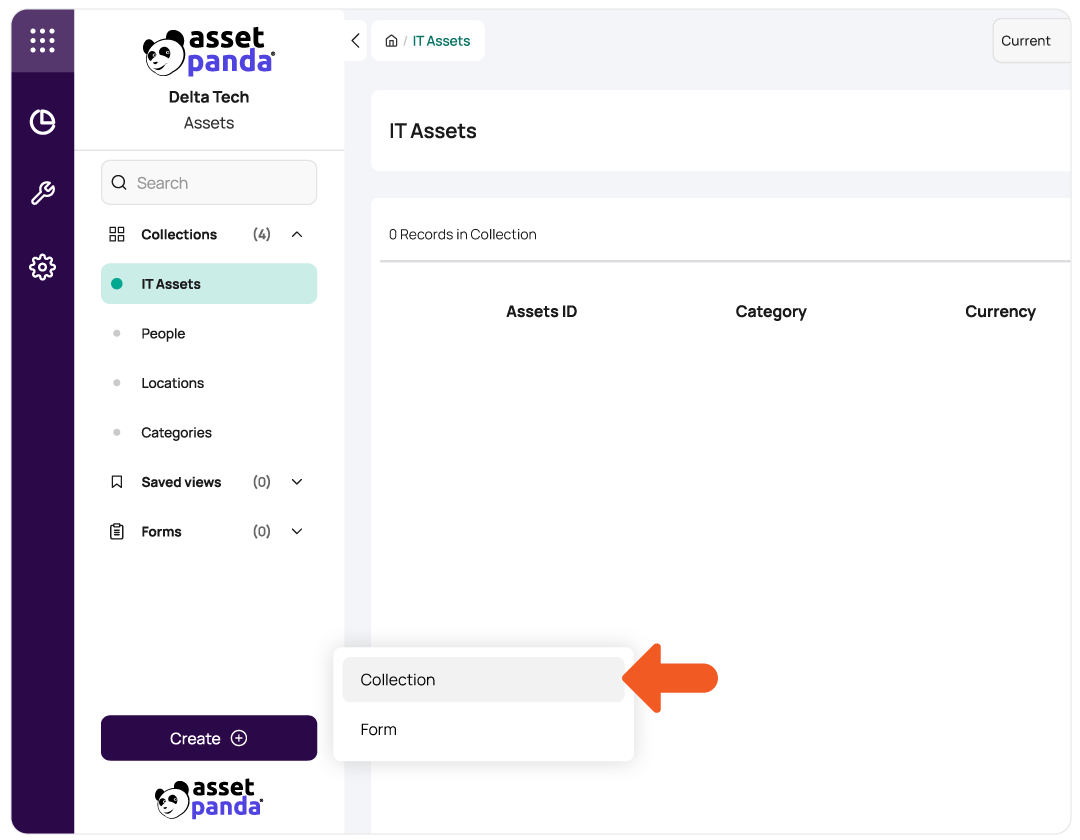
Once your collections are set up in Asset Panda, you’ll also need to add any custom fields that you’d like to track within each collection. Ensure the fields you create in Asset Panda exactly match your spreadsheet headers for smooth importing.
To create new fields within Asset Panda, select your collection, then scroll all the way to the right until you see a plus sign (+) next to your other field names. Next, you’ll see the below screen where you’ll name your field, select your data type (e.g., text, currency, address), and check off the appropriate settings.
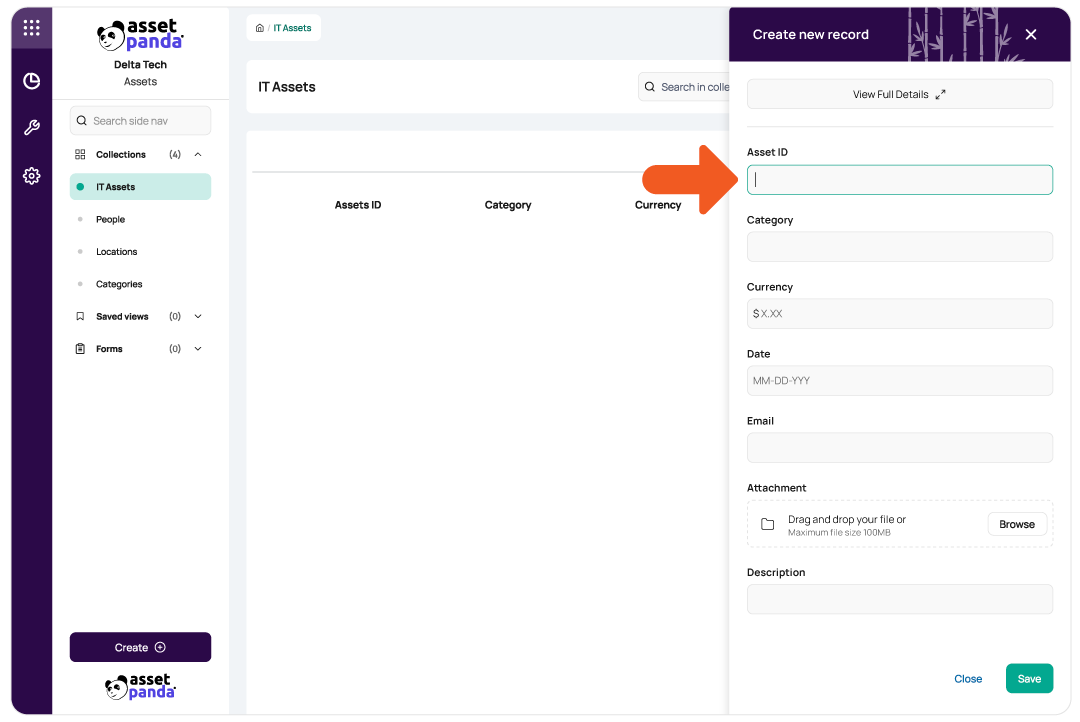
It’s important to note that you can pull field data from another collection, but that would require populating your other collections first. As an example, you might import your locations into their own collection first, then pull that data into your Assets collection to track each item’s location.
3. Bulk import your spreadsheet data into Asset Panda
With your asset inventory accounted for and your collections and fields set up, you’re ready to bulk import your data into Asset Panda. As a reminder, select one specific collection at a time when importing your data, then select Add > Import Spreadsheet in the top left-hand corner.
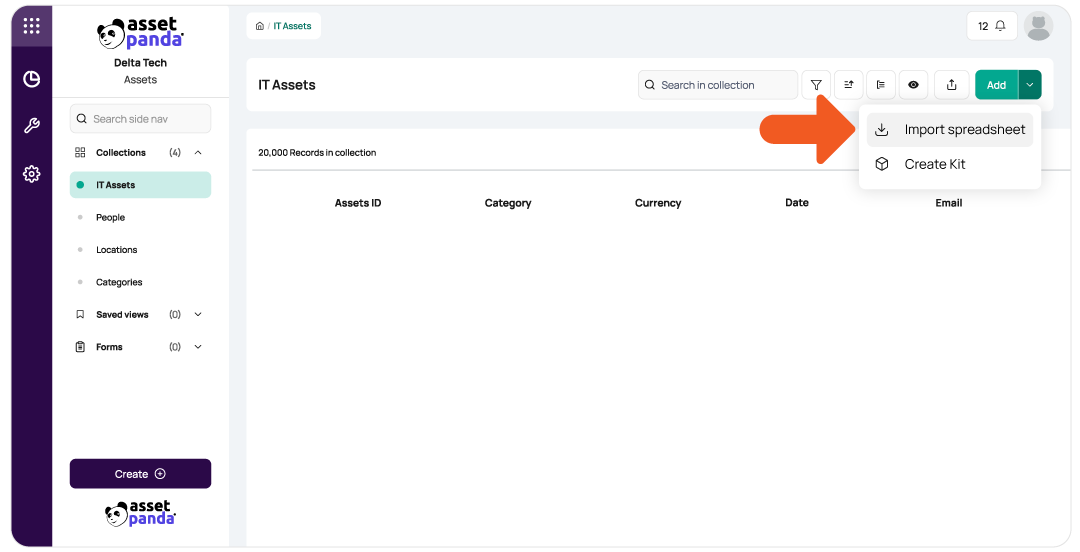
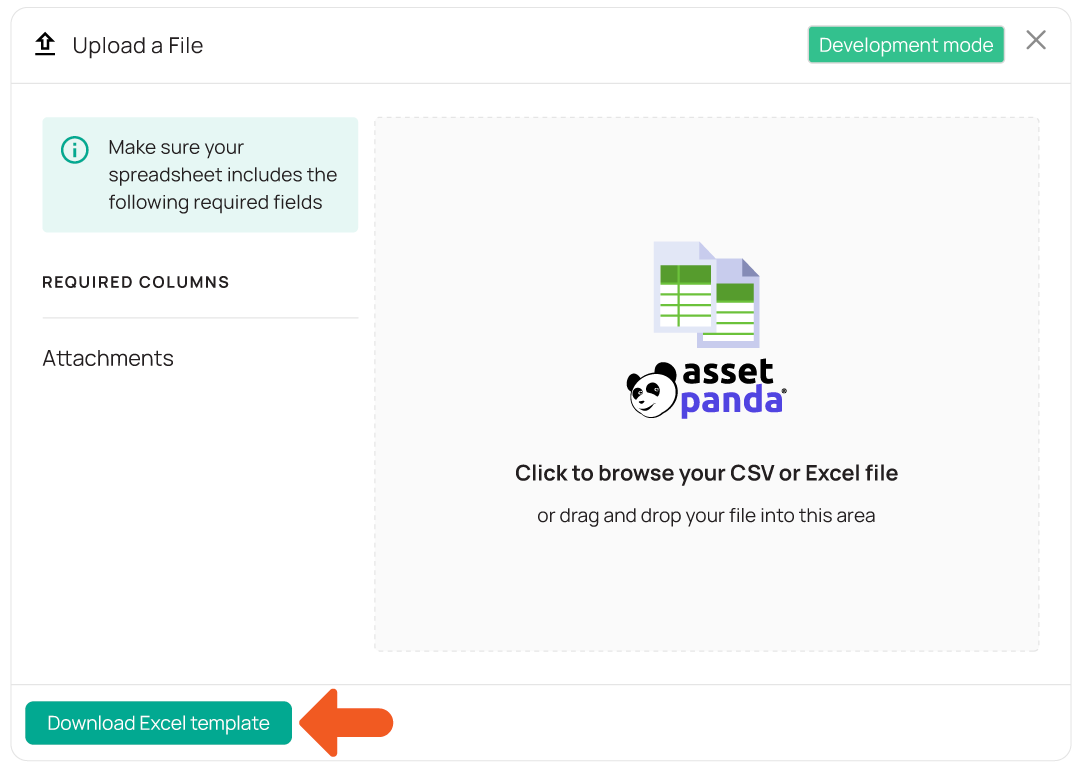
To confirm that your spreadsheet is ready to import, you can also download a sample Excel template on the lower left-hand corner of the import screen.
3 Tips to Set Your Asset Panda Program Up for Success
While it may take some time to organize your data and set up your fields and collections, the migration from Excel to Asset Panda is a simple process. But to help you truly improve productivity and accountability, here are 3 additional steps you should take to set your organization up for success.
1. Build your workflows
Once all your asset data has been successfully imported, building out your workflows in Asset Panda is an important next step. Using forms, you can easily create or update your asset records and, of course, templatize these forms for repeat use. Saving your form templates not only saves your team tons of time when they need to add or change an asset record, but it also ensures that the correct processes are followed. This is particularly important for maintaining accountability and compliance.
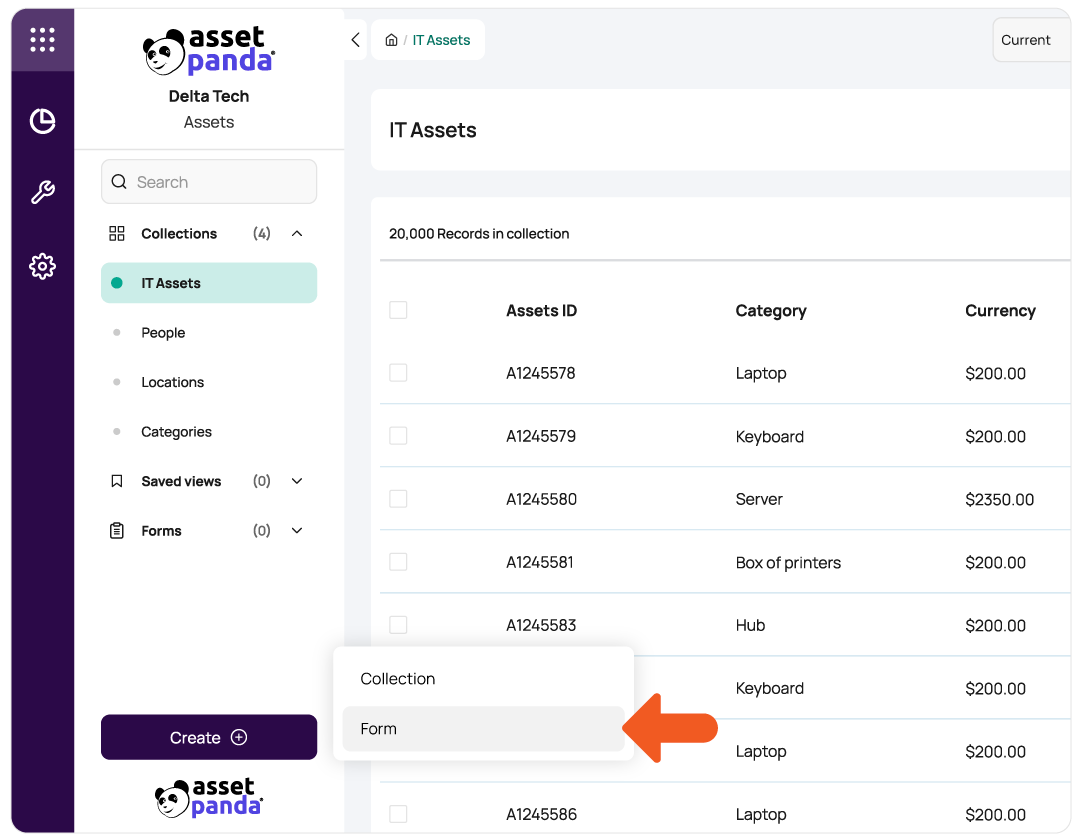
To create a form, you’ll select the Create button on the bottom left side of the screen again and click Form.
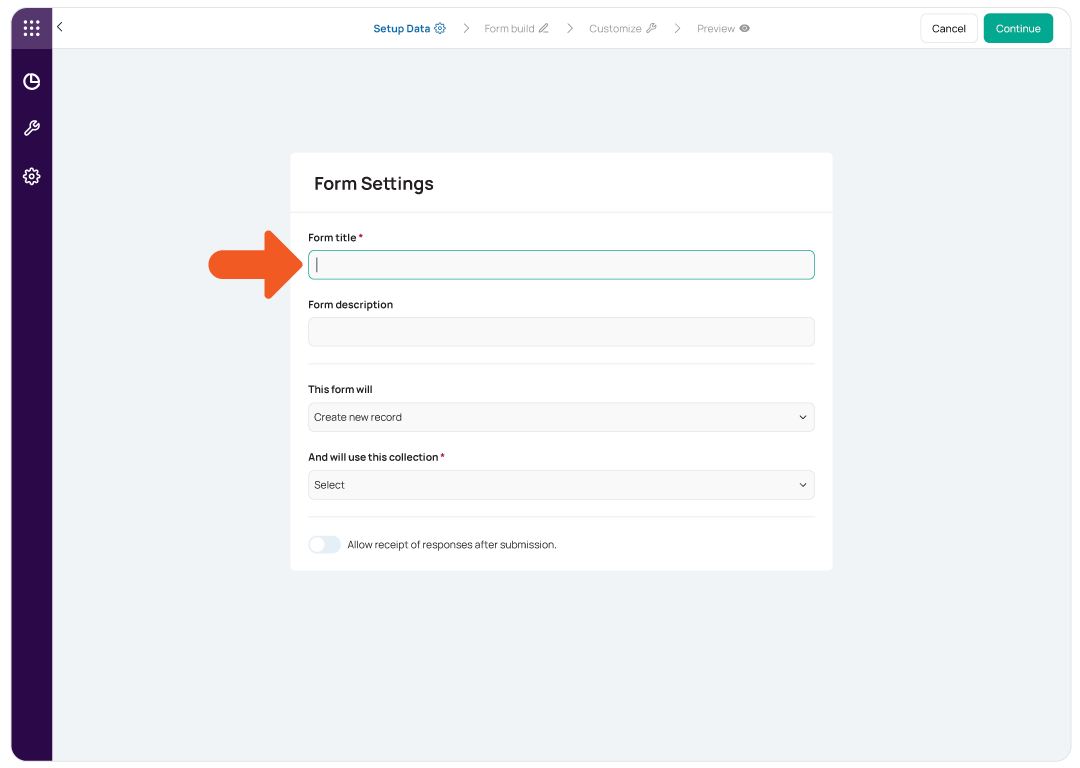
On the first form screen, you’ll give your form a title, select whether the form will create new records or update existing ones, and select which collection the form will use.
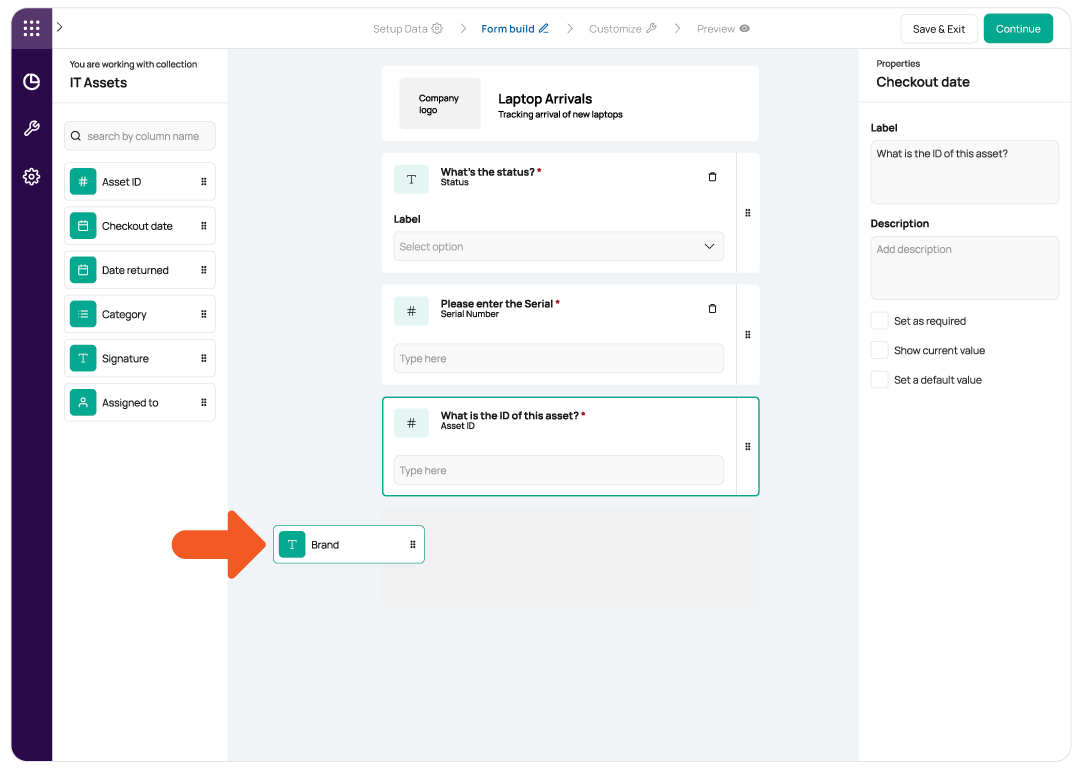
In the next screens, you can drag and drop the fields you’d like to use in this form, then customize the conditional logic of the form. Once saved, the form will appear in the left-hand sidebar to be used again for future workflows.
2. Add end users and assign permissions
Asset Panda not only empowers you to streamline your asset tracking but also allows you to get your entire staff on the same page with unlimited users. With your assets uploaded and your workflows built out, you’ll next want to add your staff members to Asset Panda. To do this, you can bulk import users by role or integrate your Asset Panda account with one of our available directories.
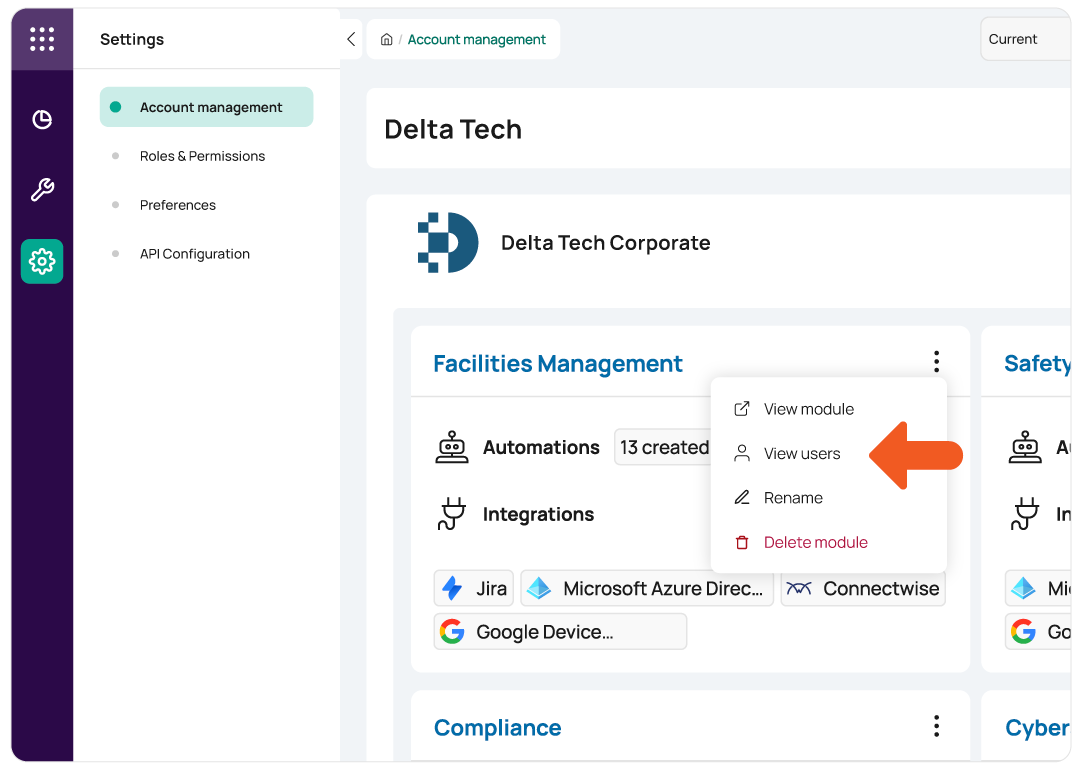
To bulk import users, toggle to your settings icon on the left-hand side, hit the ellipses for your chosen module, and select View Users.
Next, select the green Invite Users button in the upper right-hand corner to arrive at the bulk import screen. Here, you’ll select a specific user role and then paste the list of email addresses for the associated users.
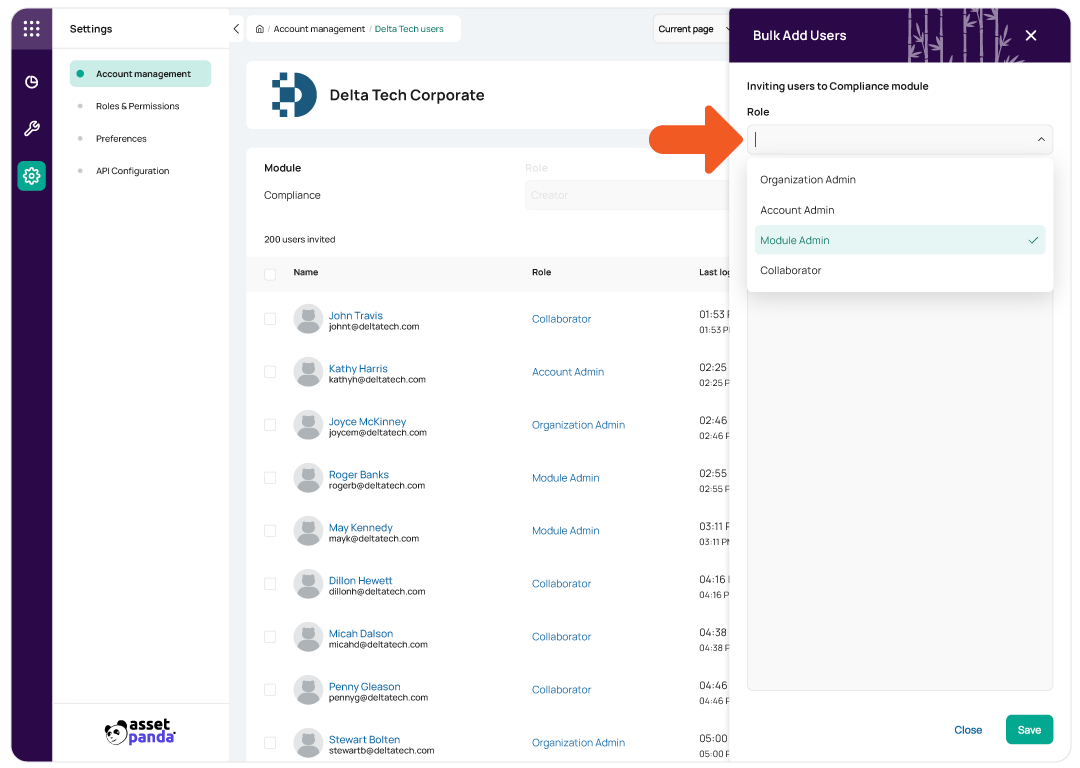
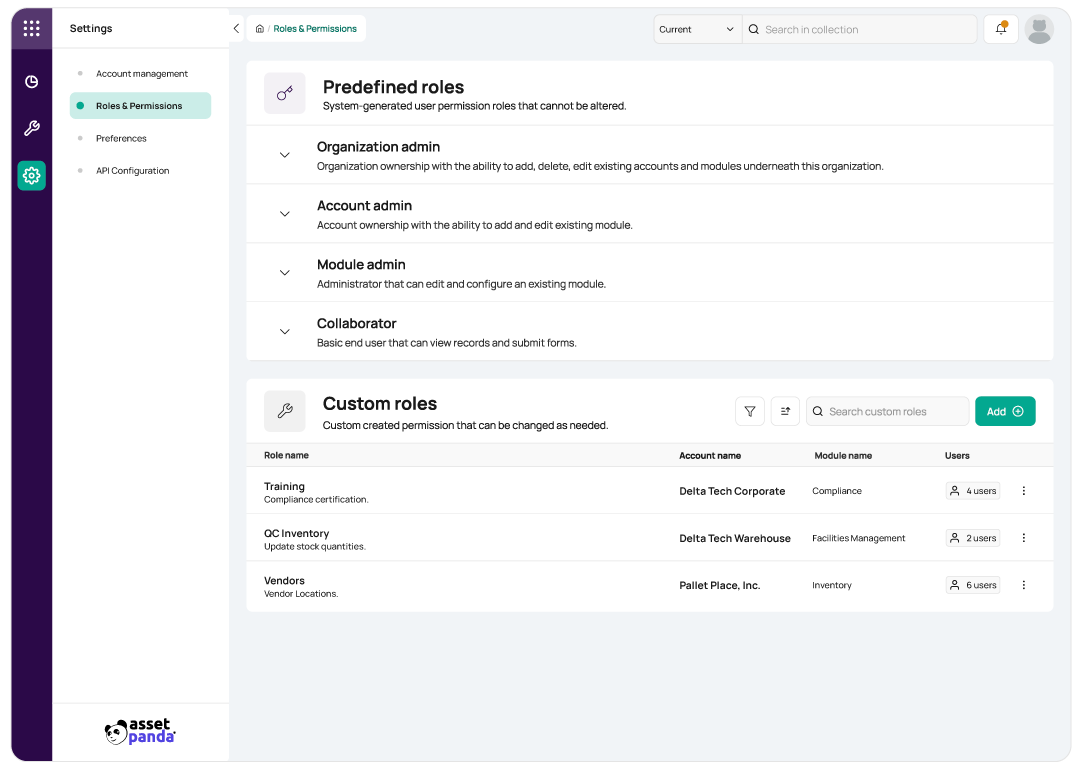
The four user roles above are Asset Panda’s ready-made user templates. Toggle to the Roles & Permissions tab to learn exactly what each role can access in your Asset Panda account, or create fully custom roles that fit your needs.
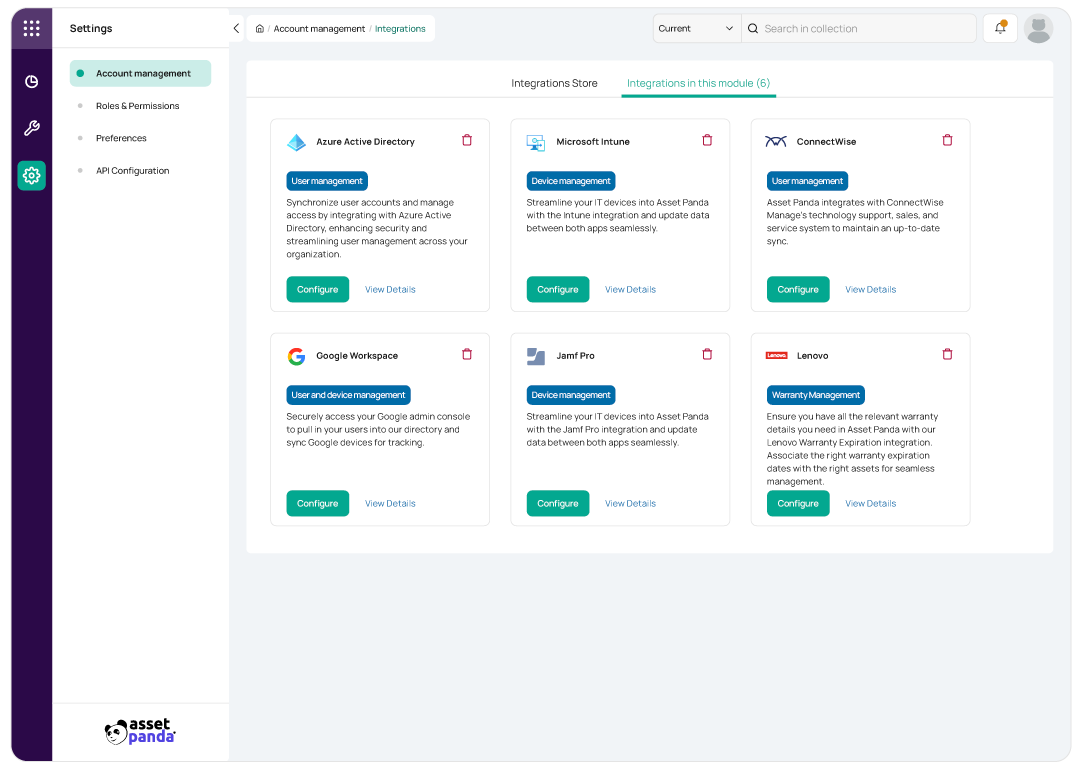
All that said, if your organization uses one of our user directory partners, toggle back to the Account Management tab, select Manage Integrations for your chosen module, then follow the steps to integrate with your current directory.
3. Set up your dashboards
Once your team is on board and your asset management program is firing on all cylinders, you’re ready to start setting up dashboards to continuously monitor and gain insights into your inventory. Our visual dashboards empower your team to quickly review the data that matters most to your team and spot any trends or anomalies in your asset data.
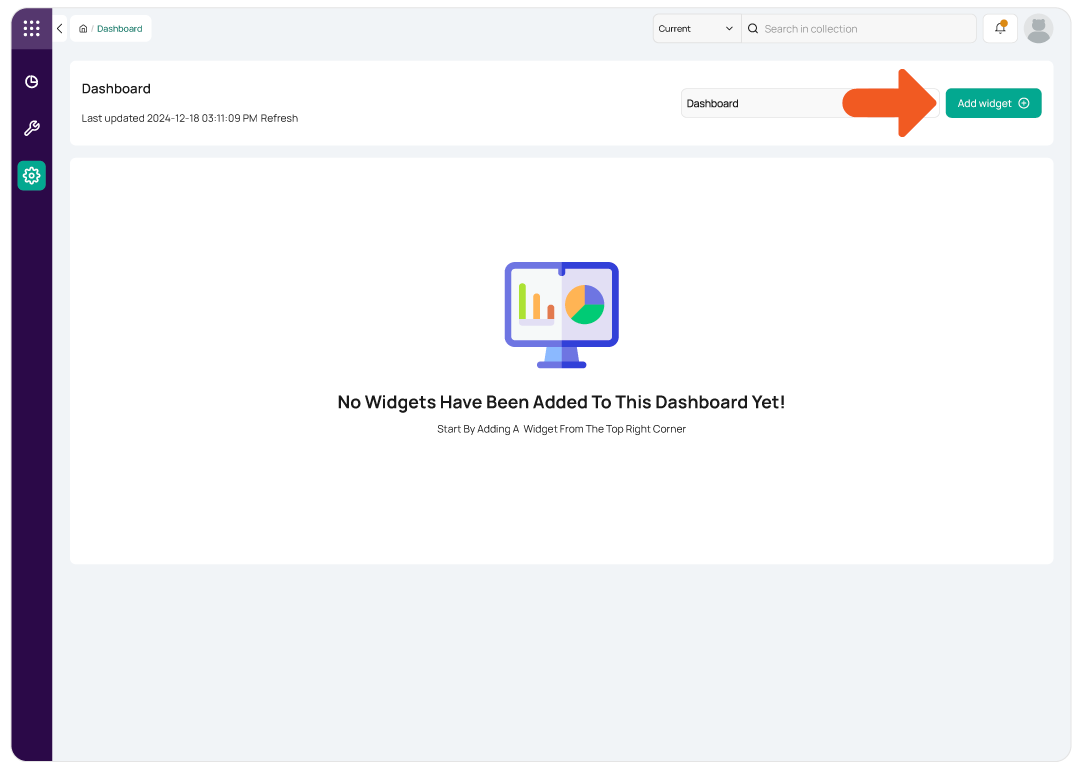
To set up a dashboard, you’ll toggle to the pie chart icon in the left sidebar, then select Add Dashboard. It’s important to note that, in the next step, you can add multiple widgets to a dashboard, so you might consider creating dashboards for each of your modules or collections.
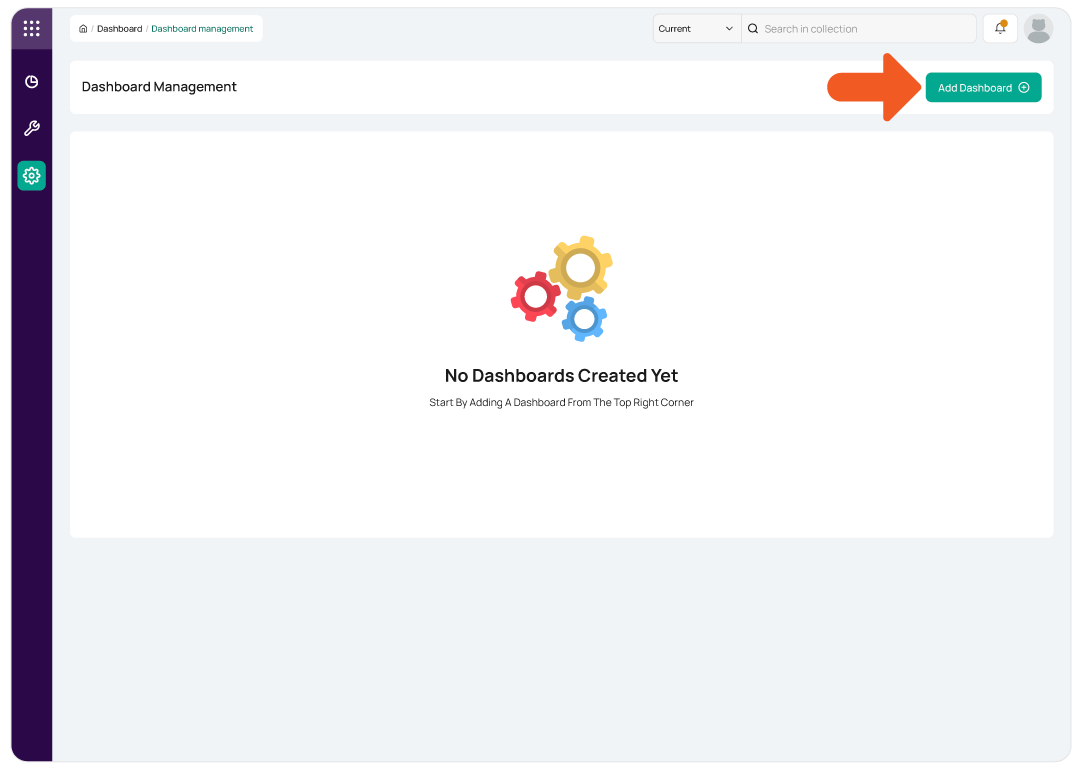
Next, you’ll select Add Widget in the top right-hand corner – you can initially choose between a pie chart or line chart, but you can choose between 5 different chart types in setup screen.
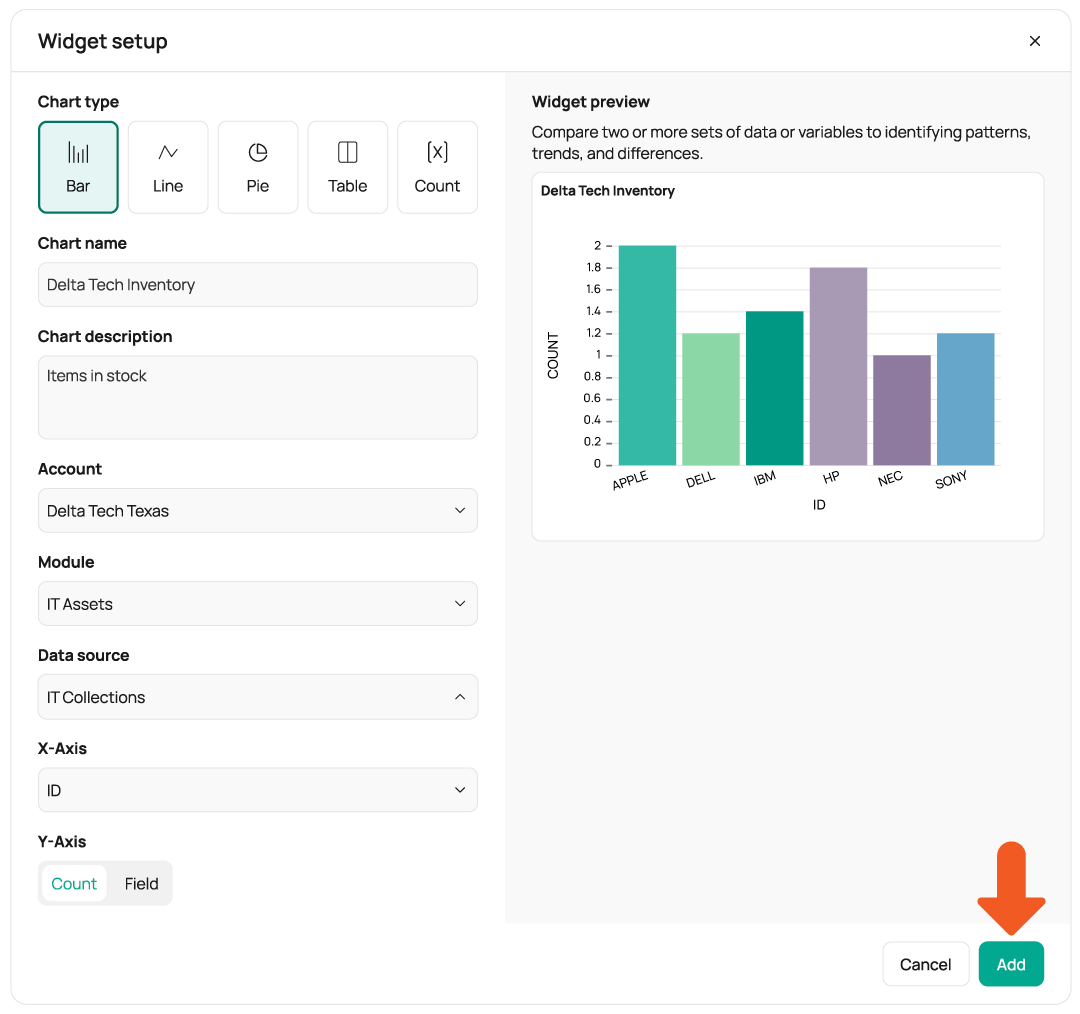
You’ll also select which account (if you have more than one) and which module the widget will pull data from, then choose your desired collection as your data source. For your X-axis or Field data (depending on the type of chart you choose), you’ll select the field you want to report on in this widget.
Getting Started with Asset Panda
As with implementing any new software solution, making the switch from Excel to Asset Panda may seem like quite a feat. However, with seamless data importing, highly customizable workflows, and unlimited users, your organization will save tons of valuable time and resources.
Ready to solve your spreadsheet-tracking woes and make the leap to a smarter solution? Request your personalized Asset Panda demo today.
Take Control of Your Assets
A personalized demo is just one click away.
Related News & Press

Learn more from an Asset Panda expert
Get a FREE consultation with an asset tracking expert to find out how you can transform your asset tracking.
Contact our Sales Team at (888) 928-6112


